Sunday, September 30, 2012

Custom Knights

Here are three custom Lego minifigures for today.


Here is my first knight. He uses a strap pushed over his armor to carry a second sword.


Here is my first archer. He has a quiver on his back over his armor.


Here is another knight. He carries a custom sword.


The sword is made of three parts. A flat, circular plate, a lightsaber handle, and a large, gray spike. 

Saturday, September 29, 2012

Beans


Objectives: To predict and carefully observe how a seed grows and compare my observations to my predictions.

Predictions:

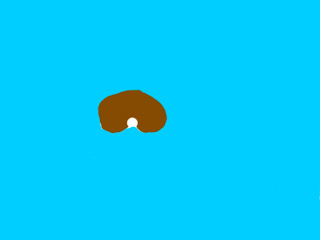
I think that if you put a bean in a glass with a damp paper towel on the bottom, the bean will lay on the bottom and after a few days, the skin will wrinkle up, the bean will turn gray, and the bean will die. I do not think the plant will sprout. Here is a picture of what I think will happen.


Observations:

The outside of the bean is brown, and has a ring around it lengthwise, where two halves of the bean meet. There is a white patch in a little indentation where the two halves meet. The bean has one flatter side to it. Here is a picture of my bean.


The cross section of the bean has a milky white interior and where the white patch is, there is a little packet of brown. The skin looks very thin on the cross section.


Monday, September 17: The beans are in a glass bottle upstairs. The beans are on their sides. Here is picture of the beans in the bottle.

Wednesday, September 19: One of the beans sprouted a root. Here is a picture of it.


Thursday, September 20: The two other beans sprouted roots. Here is a picture:

Friday, September 21: The roots on the beans got bigger. Here is a picture:


Saturday, September 22: The roots on the beans grew roots. The plant is growing upward.

Sunday, September 23: The bean appears to be climbing out of its skin!


Monday: The beans grew stilts!


Tuesday: The beans have grown leaves and eaten up their shells.


Saturday: The beans grew so tall that we had to take off the lid. The brown bean cover fell off the bean and fell to the bottom of the jar. The roots of the bean wrapped themselves around the inside of the jar. Four leaves grew on the stem of the bean and stem of the bean grew thicker.


Results:

After two days in the jar, the beans started to grow roots out of the side of it. After two more days, the bean grew a stalk upwards and white roots began to edge their way downward into the paper towel. After another day, the bean’s protective cover began to come off. Next, the beans stalk grew and pushed the brown protective shell up toward the top of the jar. Finally, the leaves came out of the protective shell and the shell fell to the bottom of the jar. The leaves grew out the sides of the stalk and up. The bean was now a seedling.

Conclusion:

The bean did not do what I predicted. Instead, the bean grew into a seedling. 

I learned that the white stuff in the bean is called an embryo that houses the food that is needed to grow the stem, the roots, and the leaves. The reason the the stem grew upwards towards the sun and roots grew downwards is because there are different types of molecules in each part of the plant that tell the roots to grow downwards and the stem to grow upwards.


Wednesday, September 26, 2012

Dragons

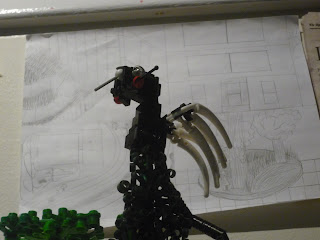
Today I built a dragon out of Legos. I call it the vampire dragon. As its name suggests, it drinks blood, but the vampire dragon does not burn in sunlight, like vampires in the movies do.


You've seen my forest without a dragon... How does it look now?


The dragon's head...


Its body...


And its tail.

Tuesday, September 25, 2012

Boats and Docks

Here are my three creations. The third is a combination of the first two.


This is my first boat that isn't a rowboat. The sail is held to the main post by a Lego whip.


Here is another dock. I connected the posts to the dock with one by two bricks with holes in them.


Here is my fishermen's boat dock. I learned that two unrelated creations can be joined together to make another from this.

Monday, September 24, 2012

Dock Sign Instructions

Here is how to make a dock sign. Enjoy your creation!


Now you know how to build it, you can add decorations. Here are some examples.


You can also add posts to it.


Ball Contraptions

Here are three ball contraption concepts for today.


This is a dock with a tentacled creature that pushes balls. I thought it would be fun to have a tentacled creature that pushes balls in the final product.


Here is a crane arm for lifting balls. It will be installed on a boat.


Here is a dock sign. I will be posting instructions soon.

Saturday, September 22, 2012

Gears and Connection Points

Here are some interesting Lego creations.


When the large gear on this contraption turns it look like ants running in circles. I learned from this that motor don't always have to line up with the studs.


This is an interesting connection point. It has a little side bar to attach things to.


This is an interesting gear connection point. It connects two differently scaled gears together.